Connect Proxmox Server with Wifi
In this tutorial, we will learn how to run Proxmox on Wi-Fi after installing it. This could work if you have your laptop and you want to run the server wirelessly or if you have a server and you want to make it work wirelessly using a Wi-Fi stick. This tutorial will not cover the bridge parts. We will focus on the part of how to connect proxmox to the wifi.
What you need before starting:
- Proxmox already installed on your server.
- LAN cable.
- Connection with your router.
Step 1: Connect your server to the router with the LAN cable
We need internet access to install some packages required for the settings in the following steps. Connect the server to your router using the LAN cable to access the internet. Afterward, check if the internet is working by running the command:
ping google.com
If the internet is not working and you don’t receive a response, you need to do some troubleshooting.
Step 2: Install required packages
We need the network-manager to be installed on the server because we will use the nmcli command later on.
Run this command to install it:
apt install network-manager
Step 3: Find the name of your network card
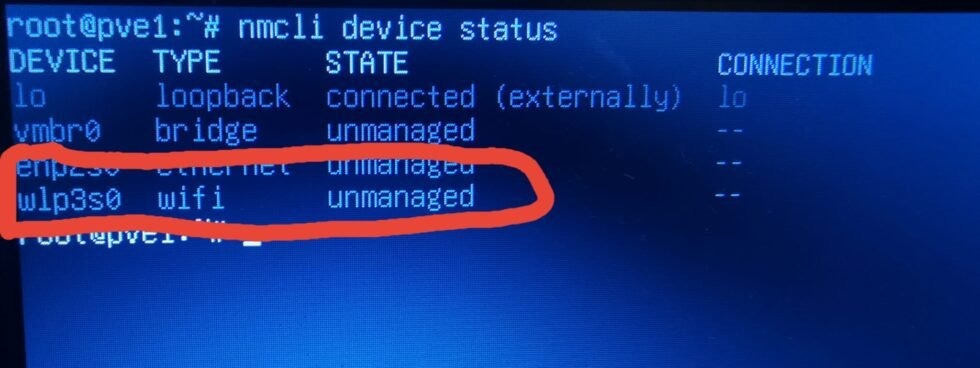
We want to use the Wi-Fi network card to access the network and the internet. To know the name of the network card, you can run:
nmcli device status
In my case, the Wi-Fi card is called wlp3s0.

Step 4: Connect to the Wi-Fi
To connect to the Wi-Fi, you need to run this command:
nmcli device wifi connect <SSID_of_your_network> password <your_wifi_password> ifname <your_wifi_network_card_name>
Replace <SSID_of_your_network> with the name of your Wi-Fi network, <your_wifi_network_card_name> with the the wifi card name (in my case it is wlp3s0) and <your_wifi_password> with your Wi-Fi password.
Step 5: Edit some configuration files
We need to edit two files to make the system recognize the network card.
First, edit the file /etc/NetworkManager/NetworkManager.conf by running:
nano /etc/NetworkManager/NetworkManager.conf
Now, change the line managed=false to managed=true. The file should look something like this:
  [main]
plugins=ifupdown,keyfile

[ifupdown]
managed=true
Next, edit the file /etc/network/interfaces by running:
nano /etc/network/interfaces
Delete the old interface and add the new one with your wifi card. In my case I should put wlp3s0 as interface.
The file should look similar to this:
  auto lo
iface lo inet loopback

iface enp2s0 inet manual

auto wlp3s0
iface wlp3s0 inet static
        address 192.168.178.47/24
        gateway 192.168.178.1
        netmask 255.255.0.0
        bridge-stp off
        bridge-fd 0
        wpa-essid <SSID_of_your_network>
        wpa-psk <your_wifi_password>

source /etc/network/interfaces.d/*
In the line address 192.168.178.47/24, you can specify your IP, and it will be changed accordingly.
Replace <SSID_of_your_network> with the actual SSID of your network and <your_wifi_password> with the actual wifi password in plain text.
Step 6: Restart networking
To make the changes work, you need to restart the networking by running this command:
systemctl restart networking
Step 7: Check if it works
Now you can check and run:
ip a
You should find your Wi-Fi network and the IP specified for it.

Next, check if the internet is working by running:
ping google.com
Conclusion:
Running Proxmox on Wi-Fi can be highly beneficial in scenarios where a wired connection is not feasible or convenient. By configuring Proxmox to utilize Wi-Fi connectivity, users gain flexibility and mobility in deploying and managing virtualized environments.
This tutorial helps users to deploy Proxmox servers in various locations without the constraints of physical network cables, making it ideal for remote setups, temporary deployments, or scenarios where network infrastructure is limited or unavailable.
Moreover, running Proxmox on Wi-Fi can streamline testing, development, and troubleshooting processes, allowing users to quickly set up and tear down virtual environments without the need for complex networking setups.
Overall, the ability to run Proxmox on Wi-Fi enhances versatility, mobility, and convenience, making it a valuable option for a wide range of use cases in both professional and personal computing environments.