Content of this page
Arduino: How to control one and two DC motors with IR remote in Arduino without drivers (control speed and rotation direction)
In this tutorial, we will guide you on how to control DC motors with Arduino. We will be able to control the speed and the rotation direction of the motors.
You will also be able to control one, two, and more DC motors with your Arduino.
What do you need for this project?
- An Arduino
- IR receiver
- IR remote (any IR remote would work)
- DC Motors
- A Computer
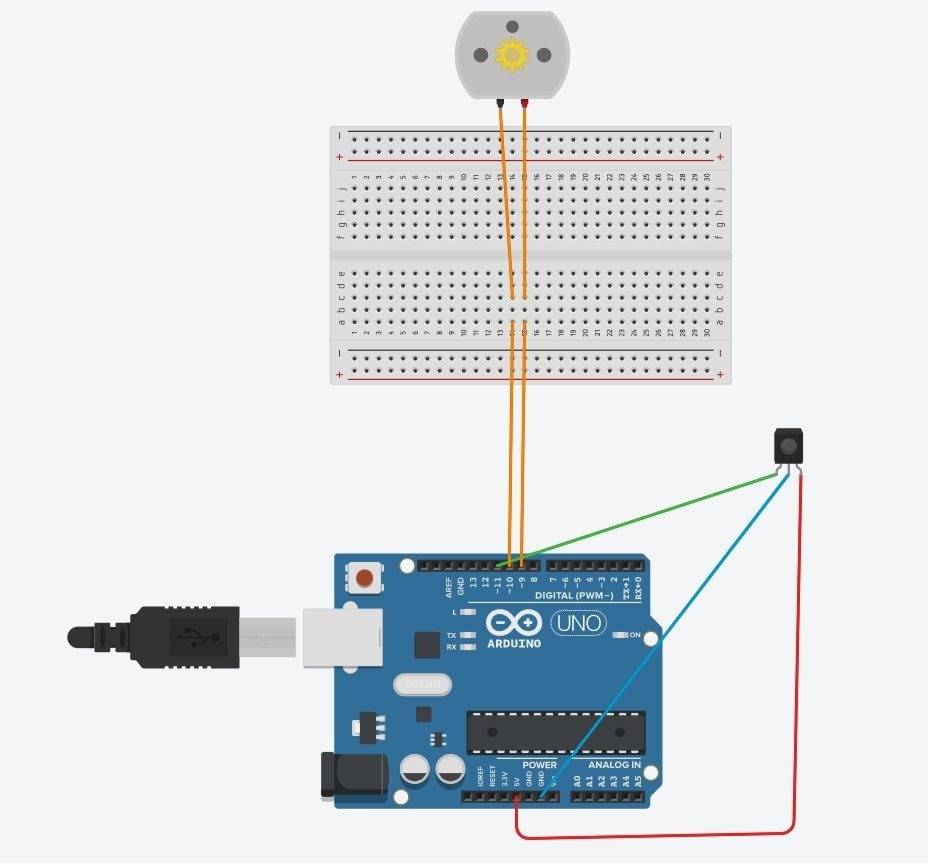
How to connect the Arduino for one motor?
- First of all, you need to find the PWM pins on your Arduino because those are the only ones that would work for us.
- Connect the two connections on your motor to the PWM pins on the Arduino.
- Start connecting the IR receiver to the Arduino too.
- The IR receiver should be connected to a PWM pin, a GND pin, and a 5V pin as shown in the picture above.
Decode the buttons on your IR remote
- First, you need to install the IRremote library on the Arduino IDE. To do this, you must follow the instructions on this website.
- Now we want to know how each button on your IR remote is coded.
- Upload this code on your Arduino:
  //Include the IRremote library header
#include<IRremote.h>
intreceiver = 11;
IRrecv irrecv(receiver);
decode_results results;

voidsetup() {
    Serial.begin(9600);
    irrecv.enableIRIn();
}

voidloop(){
    if(irrecv.decode(&results)){
        Serial.println(results.value, HEX);
        irrecv.resume();
    }
}
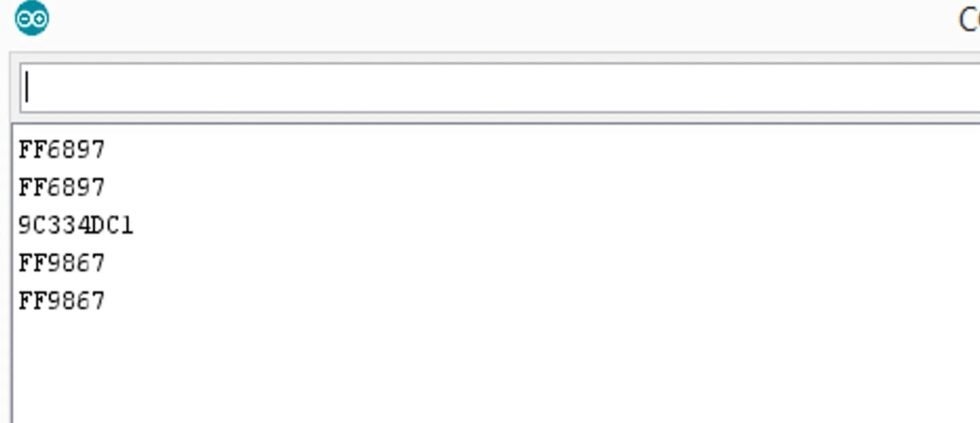
- After uploading the code on the Arduino you have to open the serial monitor on the Arduino IDE (Tools > Serial Monitor) and then press any button.
- On the serial monitor, you will see the code of this button. Copy this code and save it somewhere on your computer because you will need that later. Repeat this process with other buttons to find out their code.
Arduino code to control one DC motor with IR remote
  #include <IRremote.h>

//Those codes must be found out from the remote control (see above how to do this)
#define CLOCKWISE 0xFF6897   // for rotation in clockwise direction
#define ANTICLOCKWISE 0xFF9867 // for rotation in anticlockwise direction
#define STOP 0xE0E040BF    //to stop the motors
#define INCREASE 0xE0E006F9   //to increase the speed
#define DECREASE 0xE0E08679    //to decrease the speed

//See the circuit schematic Pictures above
int RECV_PIN = 11;
IRrecv irrecv(RECV_PIN);
decode_results results;

//Those are the PWM pins on the arduino that should be connected with the DC Motor
int motorPin1 = 9;
int motorPin2 = 10;
bool currentStatus = 0;   //This variable tells us if we move clockwise or anticlockwise

//The values of the speed (Max. is 255)
int normalSpeed = 225;
int decreaseSpeed = 200;
int increaseSpeed = 255;


void motorForward(){
    // move the motor forward
    analogWrite( motorPin1, normalSpeed );
    analogWrite( motorPin2, LOW );
    currentStatus = 1;
}


void motorBackward(){
    // move the motor backward
    analogWrite( motorPin1, LOW );
    analogWrite( motorPin2, normalSpeed );
    currentStatus = 0;
}


void increaseMotorSpeed(){
    // increase Motor Speed
    if(currentStatus){
          analogWrite( motorPin1, increaseSpeed );
          analogWrite( motorPin2, LOW );
    } else{
          analogWrite( motorPin1, LOW );
          analogWrite( motorPin2, increaseSpeed );
    }
}


void decreaseMotorSpeed(){
  // decrease Motor Speed
    if(currentStatus){
        analogWrite( motorPin1, decreaseSpeed );
        analogWrite( motorPin2, LOW );
    } else {
        analogWrite( motorPin1, LOW );
        analogWrite( motorPin2, decreaseSpeed );
    }
}


void motorStop(){
    // motor stop
    analogWrite( motorPin1, LOW );
    analogWrite( motorPin2, LOW );
}


void setup(){
    Serial.begin(9600);

    pinMode(motorPin1, OUTPUT);
    pinMode(motorPin2, OUTPUT);

    irrecv.enableIRIn();
}


void loop(){

    if (irrecv.decode(&results)){
        unsigned int value = results.value;
        switch( value ){
            case CLOCKWISE:
                motorForward();
                break;

            case ANTICLOCKWISE:
                motorBackward();
                break;

            case STOP:
                motorStop();
                break;

            case INCREASE:
                increaseMotorSpeed();
                break;

            case DECREASE:
                decreaseMotorSpeed();
                break;
        }
        irrecv.resume();
    }
}
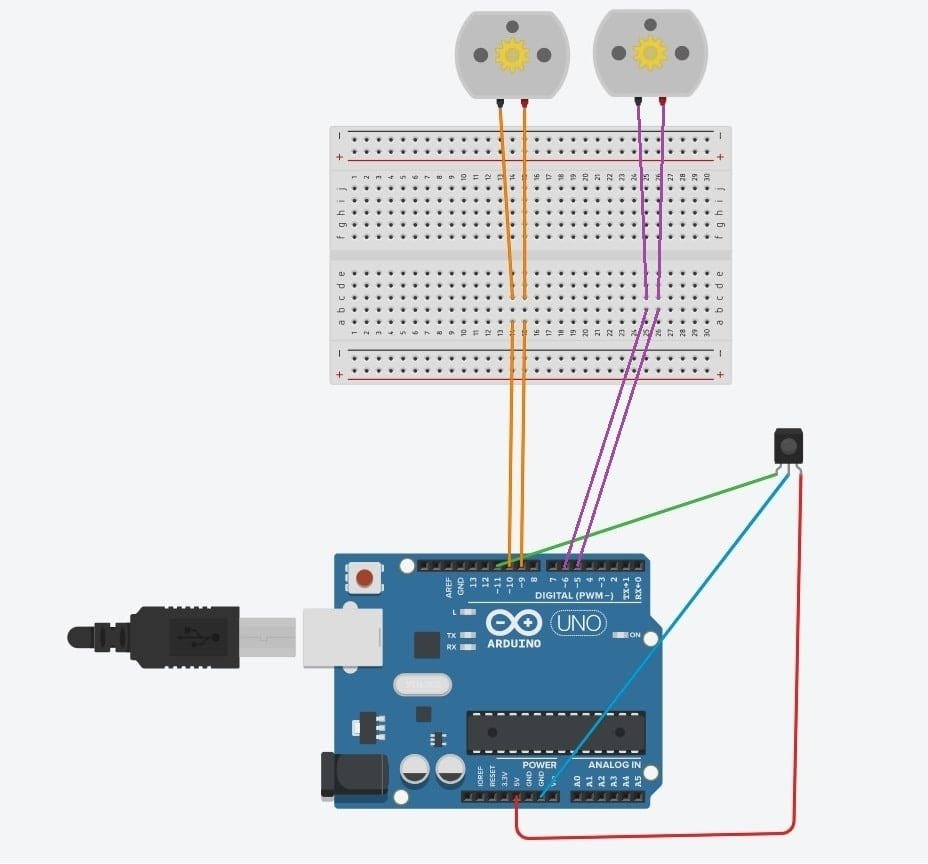
Arduino code to control two DC motors with IR remote
Now after we controlled one DC motor with IR remote, it should be easy to control two motors with the Arduino (without drivers).
The only thing you should change is to add a new DC motor and connect it to two PWM pins on the Arduino and then modify the code we wrote above.
  #include <IRremote.h>

//Those codes must be found out from the remote control (see above how to do this)
#define CLOCKWISE 0xFF6897   // for rotation in clockwise direction
#define ANTICLOCKWISE 0xFF9867 // for rotation in anticlockwise direction
#define STOP 0xE0E040BF    //to stop the motors
#define INCREASE 0xE0E006F9   //to increase the speed
#define DECREASE 0xE0E08679    //to decrease the speed

int RECV_PIN = 11;
IRrecv irrecv(RECV_PIN);
decode_results results;

//Those are the PWM pins on the arduino that should be connected with the DC Motor
//Now we want to add a new DC Motor and connect it to the new PWM (pin 6 and 5)
int motorPin1 = 9;
int motorPin2 = 10;
int motorPin3 = 5;
int motorPin4 = 6;
bool currentStatus = 0; //This variable tells us if we move clockwise or anticlockwise

//The values of the speed (Max. is 255)
int normalSpeed = 225;
int decreaseSpeed = 200;
int increaseSpeed = 255;


void motorForward(){
    // move the motor forward
    analogWrite( motorPin1, normalSpeed );
    analogWrite( motorPin2, LOW );
    analogWrite( motorPin3, normalSpeed );
    analogWrite( motorPin4, LOW );
    currentStatus = 1;
}


void motorBackward(){
    // move the motor backward
    analogWrite( motorPin1, LOW );
    analogWrite( motorPin2, normalSpeed );
    analogWrite( motorPin3, LOW );
    analogWrite( motorPin4, normalSpeed );
    currentStatus = 0;
}


void increaseMotorSpeed(){
    // increase Motor Speed
    if(currentStatus){
          analogWrite( motorPin1, increaseSpeed );
          analogWrite( motorPin2, LOW );
          analogWrite( motorPin3, increaseSpeed );
          analogWrite( motorPin4, LOW );
    } else{
          analogWrite( motorPin1, LOW );
          analogWrite( motorPin2, increaseSpeed );
          analogWrite( motorPin3, LOW );
          analogWrite( motorPin4, increaseSpeed );
    }
}


void decreaseMotorSpeed(){
  // decrease Motor Speed
    if(currentStatus){
        analogWrite( motorPin1, decreaseSpeed );
        analogWrite( motorPin2, LOW );
        analogWrite( motorPin3, decreaseSpeed );
        analogWrite( motorPin4, LOW );
    } else {
        analogWrite( motorPin1, LOW );
        analogWrite( motorPin2, decreaseSpeed );
        analogWrite( motorPin3, LOW );
        analogWrite( motorPin4, decreaseSpeed );
    }
}


void motorStop(){
    // motor stop
    analogWrite( motorPin1, LOW );
    analogWrite( motorPin2, LOW );
    analogWrite( motorPin3, LOW );
    analogWrite( motorPin4, LOW );
}


void setup(){
    Serial.begin(9600);

    pinMode(motorPin1, OUTPUT);
    pinMode(motorPin2, OUTPUT);
    pinMode(motorPin3, OUTPUT);
    pinMode(motorPin4, OUTPUT);

    irrecv.enableIRIn();
}


void loop(){

    if (irrecv.decode(&results)){
        unsigned int value = results.value;
        switch( value ){
            case CLOCKWISE:
                motorForward();
                break;

            case ANTICLOCKWISE:
                motorBackward();
                break;

            case STOP:
                motorStop();
                break;

            case INCREASE:
                increaseMotorSpeed();
                break;

            case DECREASE:
                decreaseMotorSpeed();
                break;
        }
        irrecv.resume();
    }
}